
In this article, you are going to learn about what is Arduino IDE and how to install the Arduino IDE on your computer.
What is Arduino IDE?
The Arduino Integrated Development Environment also called the Arduino IDE is the official coding platform for Arduino boards. If you want to make your electronics device and control it accordingly then you need to write some commends using C or C++ language. Writing code in the C compiler and uploading it into the Arduino board is very difficult for beginners. The main intention of Arduino developers is to make electronics easy for students, hobbyists, and artists. So, they have designed a small microcontroller-based board [Arduino] to help you make your ideas into a real prototype.
Once you are ready with your hardware design, you need to write code for that hardware to work, and here Arduino IDE is used. This IDE is equipped with all the features that made it independent for beginners, intermediate and advanced level users. You will get code editor, library files, header files, compiler, and interpreter in one place that is the beauty of the Arduino IDE.
How to install/set up Arduino IDE on your computer?
To install/set up Arduino IDE on your computer, you need to follow certain steps. Here, I am giving you step-by-step instructions to install easily.
Step 1 – Select your Arduino board and the USB cable.
There are different Arduino boards available in the market and you can choose any board depending on what type of projects you are going to make. The same IDE is used for all types of boards but you may need to change the USB cable for certain boards.
A standard USB cable [A plug to B plug] is required to connect the following boards:
• UNO
• Duemilanove
• Mega 2560
• Diecimilla
If you are using Arduino Nano for your projects, you will require an A to Mini-B cable instead of a standard USB.
Step 2 – Download Arduino IDE
There are different version of Arduino IDE is available on the official Arduino website. You have to select the right version IDE, which is compatible with your operating system [ Windows, IOS, or Linux].
Go to Arduino’s Official website
Click the software tab and choose any link from the download options
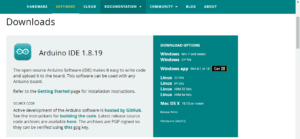
After clicking the download link you will the page below

On this page, you will get to know, when the first version was released and how many times the IDE is downloaded. The next row displays the donation option with the denominations given as $3, $5, $10, $25, and $50 which is not mandatory. You can select either ‘just download’ or ‘contribute and download’.
As Arduino is open source and the team is working hard to make things easier for you and I suggest you contribute even if it is just $3 dollars.
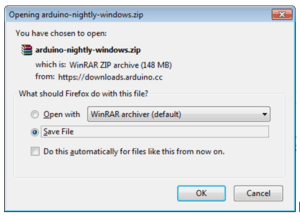
Once the download process is complete then unzip the file.
Step 3 − Launch Arduino IDE.
Once the download process is finished, you need to unzip the folder. Open the unzipped folder and check the application icon with an infinity label [application.exe]. Double-click the icon to start the IDE.

Here is the Arduino IDE open.

Conclusion:
Now, it is easy for you to download and install Arduino IDE on your computer.
If you have any doubt you can ask me through the comment box.


