
Uploading the blink sketch onto Arduino is sometimes little challenging for beginners. Through this tutorial, I am going to show you the simple process to upload the Blink Sketch from your computer onto the Arduino.
If you want to upload your sketch to the Arduino board and see it working properly without any error message then read this article. In the last part of this article, you will find some important tips for error handling that you may face during the process.
You need to have a suitable USB cable ready for uploading the code; if you want to connect the Arduino UNO board then you need a standard A to B USB cable and USB A to C type for Arduino Nano board.
How do I upload a sketch?
Step 1: Open Arduino IDE on the computer.
Step 2: Connect your Arduino board with a suitable USB cable to the computer.

Step 3: Go to File Menu and select Example
Step 4: Select Basic and click on Blink and the Blink Sketch will open in the IDE.

Step 5: when your Arduino is connected to the PC/ Laptop, the power LED on the Arduino Uno will glow which indicates that the board is properly connected to the computer. In this case, Arduino receives the power from the PC/ Laptop and you do not require a separate power source for the Arduino.
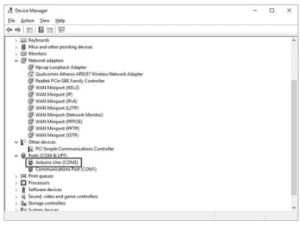
Step 7: Here you have to check whether the Windows Operating System can recognize the board.
- To check this you need to go to the Control Panel and then open the Device Manager Window. See the image below.

- Click the Ports (COM & LPT) section in the device manager and you can see the port through which Arduino is connected. In the above image, the COM3 port is highlighted. Remember that the COM port may be different in your computer.
Step 6: Now you go to Tools Menu and select Serial Monitor (Tools → Serial Port). You can see a drop-down list of available serial ports on your computer. In each computer, you may see a different combination of serial ports. It mainly depends on what other devices are used on your computer.
If you use Windows Operating System, you can see the ports are listed as COM entries. If there is only one COM port available then select it. In case of multiple COM entries, most probably your board will be connected to the last entry, check the last entry to find your board.
For the Mac users, you can find the board listed twice if the board is Uno:
/dev/tty.usbmodem-xxxxxxxx
/dev/cu.usbmodem-xxxxxxxx
If your board is an older version, it will be displayed as:
/dev/tty.usbserial-xxxxxxxx
/dev/cu.usbserial-xxxxxxxx
Remember that each board carries a different number for – xxxxxxxxxx and you have to choose either of these numbers.
How do I upload the sketch?
There are three different ways you can upload the Sketch to Arduino:
1- Go to Sketch Menu and select Upload / Upload using Programmer

2. Click the upload button from the icon bar. The second button from the left is the Upload Button.
![]()
3. Use the keyboard shortcut Ctrl+U for Windows OS and ⌘+U on a Mac.
How do I run an Arduino Blink Sketch after Uploading
The Arduino IDE compiles the code before uploading it to the Arduino board. You can observe that the LED stops flashing and two lights (labeled as Serial LEDs) below the flashing LED flicker for a couple of seconds as the code uploads. The green LED connected to Pin 13 will start flashing again as the code runs.

You can compile the sketch without connecting the Arduino board to your computer. But to upload the code to Arduino you need to connect the board using the USB. Remember that you need to tell the IDE which board and serial port you are using.
When you click the upload button and the process starts, whatever sketch is running on the board will stop (suppose if you were running the Blink sketch, the LED will stop flashing). The new sketch will be uploaded replacing the existing sketch and it will run after successful completion.
How to upload sketches in the old version of Arduino boards?
If you have an older version of Arduino boards or some compatibles, it will not automatically interrupt the running sketch to initiate the upload process. In such a case you need to reset the board by pressing the Reset Button on the board immediately after the software display the ‘done compiling’ message(when it shows the message about the size of the sketch).
Sometimes, it may need a few efforts to get the timing accurate between the end of the compilation and pressing the Reset button.
If the uploading process is not completed then the IDE will display an error message. The main problems, in this case, are usually due to the followings:
- The wrong board was selected
- The wrong serial port was selected
- Board not being plugged in
To rectify the issue, check the status bar (the bar displayed at the extreme bottom part of the IDE) that displays both the currently selected board and serial port.
If you are not able to identify the correct port on Windows try the followings:
- Way 1: Unplug the Arduino board and then select Tools→ Serial Port to see which COM port is not listed on the display list.
- Way 2: Select the ports one by one until you see the lights on the board flicker to indicate that the code is uploading.


