
Detect Key Press with Microcontroller:
If you want to detect a key press from a Casio classic calculator using a microcontroller then follow these steps;
Step 1: The first thing you need to do is interface the microcontroller with the calculator’s keypad.
Step 2: Read the input signals from the keypad.
Step 3: Determine which key has been pressed.
Here’s a general outline of the steps you would need to follow:
First, you need to identify the type of keypad used in the Casio Classic Calculator. If I consider the keypad a matrix keypad, where the keys are arranged in a grid of rows and columns;
Now, you determine;
- The number of rows and columns in the keypad.
- Identify the pinout and electrical characteristics of the keypad.
Then the next step is to connect the keypad to the microcontroller. In this step, you may need to use an external pull-up or pull-down resistors to ensure the signal levels are working properly.
After that, connect the rows of the keypad to the output pins of the microcontroller and the columns to the input pins.
Now, it’s time to configure the microcontroller’s GPIO pins, where you set the rows as outputs and the columns as inputs. You may need to configure the internal pull-up or pull-down resistors on the input pins, if necessary.
Scan the keypad:
In this step, you can scan the keypad using a loop and sequentially activate each row of the keypad by setting the output pin to a logic high level. While reading the state of the input pins, if a column input pin reads a logic high level, that means the key corresponding to that raw and column is pressed.
Decode the key pressed:
You need to determine which key has been pressed based on the row and column of the pressed key according to the keypad’s layout and mapping.
Take appropriate action:
Once you have detected that a key has been pressed and determined which key has been pressed, take appropriate action. Use the code in the microcontroller to update the display, perform a calculation, or trigger an event.
Repeat the process:
Use a loop continuously and detect key presses as long as the calculator is powered on.
Note:
Remember that you need to be a little careful while interfacing the Casio Classic Calculator’s keypad with the microcontroller. Read the Casio calculator’s documentation. Also, try to understand the requirements and limitations of both devices before attempting to interface them.
Additionally, check the legal or ethical considerations, related to reverse engineering or interfacing with proprietary devices.
Example Code:
Here’s an example of Arduino code that can be used to detect a key press from a Casio classic calculator using a microcontroller. Please note that this is a general example, and the exact implementation may vary depending on the specific Casio calculator model and the microcontroller being used.
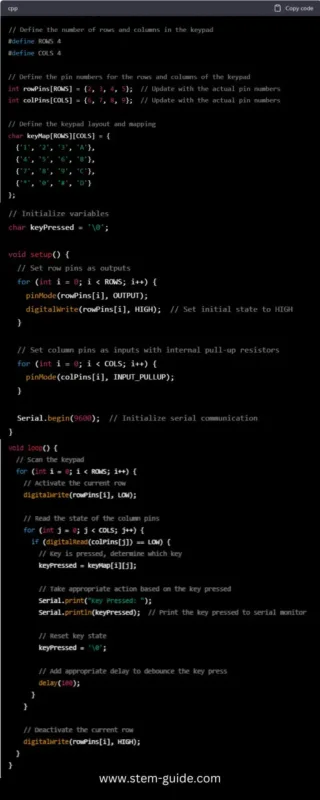
// Define the number of rows and columns in the keypad
#define ROWS 4
#define COLS 4
// Define the pin numbers for the rows and columns of the keypad
int rowPins[ROWS] = {2, 3, 4, 5}; // Update with the actual pin numbers
int colPins[COLS] = {6, 7, 8, 9}; // Update with the actual pin numbers
// Define the keypad layout and mapping
char keyMap[ROWS][COLS] = {
{‘1’, ‘2’, ‘3’, ‘A’},
{‘4’, ‘5’, ‘6’, ‘B’},
{‘7’, ‘8’, ‘9’, ‘C’},
{‘*’, ‘0’, ‘#’, ‘D’}
};
// Initialize variables
char keyPressed = ‘\0’;
void setup() {
// Set row pins as outputs
for (int i = 0; i < ROWS; i++) {
pinMode(rowPins[i], OUTPUT);
digitalWrite(rowPins[i], HIGH); // Set initial state to HIGH
}
// Set column pins as inputs with internal pull-up resistors
for (int i = 0; i < COLS; i++) {
pinMode(colPins[i], INPUT_PULLUP);
}
Serial.begin(9600); // Initialize serial communication
}
void loop() {
// Scan the keypad
for (int i = 0; i < ROWS; i++) {
// Activate the current row
digitalWrite(rowPins[i], LOW);
// Read the state of the column pins
for (int j = 0; j < COLS; j++) {
if (digitalRead(colPins[j]) == LOW) {
// Key is pressed, determine which key
keyPressed = keyMap[i][j];
// Take appropriate action based on the key pressed
Serial.print(“Key Pressed: “);
Serial.println(keyPressed); // Print the key pressed to serial monitor
// Reset key state
keyPressed = ‘\0’;
// Add appropriate delay to debounce the key press
delay(100);
}
}
// Deactivate the current row
digitalWrite(rowPins[i], HIGH);
}
}
Conclusion:
If you have any questions, feel free to write in the comments sections!


