Structure of Arduino Sketch
Suppose that you are new to programming and want to understand the structure of the Arduino program. Here, I am going to make the Arduino program easy for you to learn and give the building blocks of an Arduino sketch.
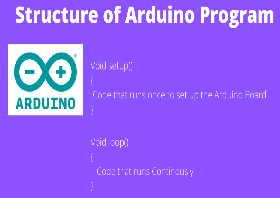
In a Sketch [Arduino Program], there are only three sections of codes that are found in a simple program. The first section is where you need to declare the variables to connect the required pins, the second part that comes under the setup() function, and the second part that comes inside the loop() function.
See the example:
Int ledPin=13; // Declare the variables:
The variable needs to be declared at the beginning of the sketch. So always use the variables before using the setup() function.
![]()

Some of the code statements in your Arduino sketch need to run only once during the execution of the program. This type of code segment comes under the setup() function. The code inside the setup function is used to introduce the input and output pins to the Arduino board.
In the example below, I will show you how to use digital pin 13 to glow an LED connected to pin 13. You can use the Arduino pins either to receive information from a sensor that is called the input or send some value that is called output. As you are writing this code to glow an LED connected to digital pin 13, you need to consider the pin mode as output and use the function pinMode() inside the setup function.
Void setup()
{
pinMode(ledPin, OUTPUT);
}

![]()
You should use the word ‘void’ before the setup() to tell the microcontroller not to return any value. In C and C++, every function by default returns some value but you can stop it by using the word ‘void’ before every function you call inside the program.
The pinMode() function need two parameters to be mentioned inside the setup(). The first one is the pin number that you are going to use and the second one is the mode of operation to be performed. In the declaration statement, I have to use the variable int ledPin=13 to assign pin number 13 to ledPin. I will use pin 13 to glow an LED and hence the mode is output.
You need to write the OUTPUT in capital letters, otherwise, you will get an error message and put a semicolon after each statement. So, the pinMode(ledPin, OUTPUT) is a complete statement and a semicolon is required. If you missed the semicolon the compiler will display an error message.
void loop()
{
digitalWrite(ledPin, HIGH); // turn the LED on
delay(1000); // wait a second
digitalWrite(ledPin, LOW); // turn the LED off
delay(1000); // wait a second
}
The line of codes inside the void loop() function will run over and again until the power source is disconnected from the Arduino board.
digitalWrite(ledPin,HIGH);
The above line of code statement will put pin 13 into a HIGH mode (ON state) and release 5v to pin 13 and the delay(100) statement will tell the microcontroller to continue the process for 100 milliseconds. The LED will glow for a duration of 100 milliseconds.
digitalWrite(ledPin,LOW);

![]()
Again, the above statement will put pin 13 in LOW mode (off state) and stop releasing 5v to it. And the delay(100) statement will tell the microcontroller to stop the process of releasing 5v to pin 13 for a duration of 100 milliseconds. The LED will stop glowing for 100 milliseconds.
The same process will continue until you unplug the power button from the Arduino.
When the Arduino IDE finishes uploading the code, and every time you power on the board after you’ve uploaded this code, it starts at the top of the sketch and carries out the instructions sequentially. It runs the code in setup once and then goes through the code in the loop. When it gets to the end of the loop (marked by the closing bracket, }) it goes back to the beginning of the loop.
Once the above code is uploaded by the Arduino IDE, and every time you power on the board, the execution of the instructions starts at the top and carries out sequentially. It runs the code in the setup once and then goes through the code inside the loop() function. When, the execution of the instructions reaches the end part denoted by the closing brackets (‘}’), sequentially, it goes back to the beginning part of the loop.
What are the three main parts of the Arduino program?
As we have learned in this example, there are three main parts of the Arduino program are:
- Declaration part at the beginning
- Setup() part in the middle
- Loop() part in the last.

I hope you understand the basic structure of an Arduino program and if you have any doubt, write in the comment section and subscribe to my blog with your email id.
You can check how to create a sketch in Arduino

