Using Arduino IDE is very simple. I am going to explain to you how to use Arduino software in an easy and step-by-step way throughout this post. The first thing that I am going to tell you is about the structure of the Arduino and what it looks like. The software is designed in a user-friendly way and it looks almost similar in both Windows and Mac. There is only a small difference in using the short cuts keys that you will learn in this article.
You can use Arduino IDE for the following purposes:
- Create a New Sketch
- Open an existing Sketch
- Modify sketch to tell you Arduino board what to do.
- Verify a Sketch
- Stop
- Save a sketch
- Upload a sketch to your Arduino board
- Use Serial Monitor
Now, let me show you the IDE. Once you open your Arduino software you will see six buttons available just below the address bar and each of these is given to use for a certain purpose. You can also use the menu bar or keyboard shortcuts to use those features.
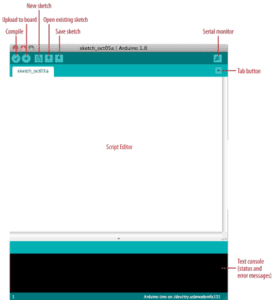
Compile Button: use this button to check your code for errors. If there is a syntax error in your source code for example if you miss putting the [‘;’ semicolon] at the end of the statements the Arduino software will highlight the statement with an error message in the text console.
Upload to board Button: This button is used to upload your sketch into the Arduino board and it works only after you code error-free. If you press the Upload button without compiling your sketch then it will first check whether there are any errors available in the source code.
New Button: This button is used to create a new sketch.
Open Existing Sketch Button: Use this button to open any existing sketch.
Save Sketch Button: To save button to store the code in your computer hard disk
Serial Monitor: is used to seeing the communication between the computer and the Arduino board or sometimes you can use a serial monitor to check the sensor readings (a value that the sensor is reading from its surroundings) connected to your Arduino board.
Tab Button: This button is basically useful for advanced-level Arduino users. You can organize your long codes into small files.
Scrip Editor: The script editor is the area where you can write your code or view codes. It provides the common text editing features that you can use in any other text editing software. You can use the following shortcut keys make to things easy for you.
- Ctrl+F (⌘+F on a Mac) to find any text
- Ctrl+C (⌘+C on a Mac) to copy highlighted text
- Ctrl+V (⌘+V on a Mac) to paste the highlighted text
- Ctrl+Z (⌘+Z on a Mac) for undo
Now, you will learn how to load the Blink sketch to your script editor. The blink sketch is the program that comes preloaded with every standard Arduino board. You may have a question in your mind that why this sketch is preloaded with every Arduino? – The possible answer is that the Arduino board has an inbuilt LED connected to the digital pin 13 and the blink sketch is loaded to check the board is working fine or not.
The best feature of learning Arduino IDE for beginners is the example code is available in the software. You will find almost all the basic programs required to stat leaning Arduino in the software itself. To find the Blink sketch you have to follow these steps.
- Open the Arduino IDE
- Go to File -> select Examples
- Go to 1. Basics-> click on Blink
The code will be displayed in the script editor as given below.

Once your Blink sketch is ready and you want to upload this sketch into your Arduino to control the LED connected to the digital pin 13. But remember that the sketch is not going to work you need to covert this code into instruction (machine-level instructions) that the microcontroller chip of the Arduino board can read and execute.
This is a process is called compiling where the code you have written in the Blink sketch will be checked for any kind of syntax error. If there is any syntax error found in any of the statements (line of code) then that line of code will be highlighted by the software showing one or two errors message in the text console below the script editor. The syntax errors are the grammatical rules of programming languages as we know that for writing in English we need to follow certain rules.
There are three different ways to compile your Arduino sketch:
- Click the compile button on the left top corner of the Arduino IDE.
- Select Sketch-> Verify/Compile
- Ctrl+R on windows and ⌘+R on a Mac
After pressing the compile button, look at the bottom of the script editor. There will be a message in the text console “Compiling sketch……” with a green color progress bar. This process normally takes one or two seconds and the message “Done Compiling“appears. The black console area will also contain the following additional message;
Binary sketch size: 1026 bytes (of a 32256 bytes maximum)
This message is showing you the exact size of the sketch and the maximum size that the Arduino board can accept. This may change depending on the type of the Arduino board and the version.
Here is a question what is a sketch?
– The source code you write in the script editor of your Arduino IDE is called a sketch. The sketch is a collection of simple statements written in English-like language with math symbols logical operators. These statements are easy to understand for human but to make the microcontroller execute those statements needs to be converted to machine language (a series of 0s and 1s).
The process of converting your sketch into a microcontroller readable format is called compilation. The IDE [Integrated Development Environment] uses some command-line tools to compile a sketch. Don’t worry, if want to know more about what happens during the compilation process behind the scene read the Arduino Build Process.
Note: A final message will display the size of the sketch that indicates how much program space is needed to store the controller instructions on the board. Remember that if the size of your compiled sketch is greater than the available memory on the board, the following error message is displayed.
[Sketch too big; see http://www.arduino.cc/en/Guide/Troubleshooting#size for tips on reducing it.]
If you see a similar message, you need to reduce the size of the sketch to put it on the board or change the board with a higher capacity.
Now, you may have a question that how to identify if there are any errors in the code? – this is very simple to identify. You just need to have an eye on the text console window below the script editor. If there are any errors in the code, the compiler will print one or more error messages in the console window. For more information check the troubleshooting software errors.
Tips: The Arduino IDE does not allow you to save the changes you make in the example sketch to prevent accidental overwriting of the examples. To save the changes you made, go to File -> click Save As option and change the name. For the new sketches use the save button only.
Perhaps the most convenient way to learn Arduino coding is that, as you develop and modify a sketch, consider using Save As an option to give a different name or version number so that as you implement each bit, you can go back and check an older version if required.
Remember, the code uploaded onto the Arduino board cannot be downloaded back onto your computer. Make sure that you save the sketch on your computer before uploading it onto the board. You cannot save changes back to the example files.